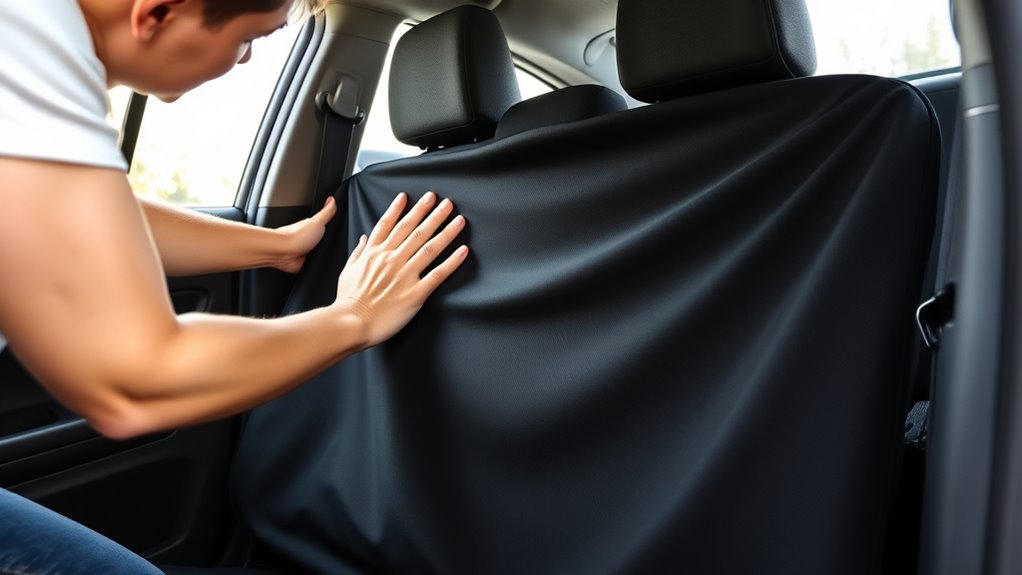
How to Install Car Seat Covers: A Simple Step by Step Guide
Installing car seat covers can seem tricky at first, especially if you’re worried about making a mess or getting it just right. You’re not alone—many people struggle with fitting covers securely and smoothly. But don’t worry, with a few simple steps, you’ll have your seats looking fresh in no time.
To install car seat covers, start by preparing your interior: vacuum seats and wipe away dust. Choose covers that fit your seat style and size, and gather necessary tools like scissors or a staple gun. Remove headrests or armrests if needed for easier fitting.
Stretch the covers over and secure them with straps, hooks, or clips, smoothing out wrinkles as you go. For more helpful tips, keep exploring how to make your installation quick and secure.
Key Takeaways
- Prepare your vehicle by cleaning the seats and removing clutter to make the installation process smoother.
- Choose the right seat covers based on material, fit, and style to ensure they work well with your seats.
- Gather essential tools like scissors, hooks, and zip ties before you start, so you’re ready to go.
- Carefully fit and secure the covers, adjusting straps and tucks until they look snug and wrinkle-free.
- Don’t forget to regularly clean and maintain your covers to keep them looking fresh and to extend their lifespan.
Why Proper Seat Cover Installation Matters
Proper seat cover installation is crucial because it guarantees your covers stay securely in place and provide the protection you expect. When installed correctly, seat covers improve safety by preventing loose fabrics from shifting or slipping, which could distract or interfere with your ability to control the vehicle.
Proper installation keeps seat covers secure, enhances safety, and maintains a neat, polished look.
They also make sure your seat’s safety features, like airbags, work properly in emergencies. Beyond safety, proper installation really impacts how good your car looks.
Well-fitted covers look neat and professional, boosting your vehicle’s interior style. Ill-fitting or loose covers can look sloppy and take away from your car’s overall vibe.
By taking the time to install your seat covers properly, you’re not just improving safety—you’re also creating a polished, attractive interior. This combo of safety and style makes proper installation worth it.
It guarantees your investment gives you both protection and visual appeal.
How to Choose the Right Seat Covers for Your Car
Choosing the right seat covers can really boost your vehicle’s comfort, style, and protection. Start by thinking about fabric types—whether you want durable leather for a sleek look or breathable mesh for hot weather, your choice affects comfort and how long they last.
Next, look at style options that match your personality and your car’s interior. From simple solid colors to bold patterns, pick covers that enhance your vehicle’s look. Think about your lifestyle too; if you have kids or pets, waterproof or stain-resistant fabrics like neoprene or polyester might be better.
Also consider how easy it is to clean and maintain the covers. Some materials need more care than others. Finally, measure your seats carefully to make sure the covers fit properly. By considering these factors, you’ll find seat covers that look great, meet your needs, and make driving more enjoyable and protected.
Preparing Your Car Interior for Seat Cover Installation
Before installing new seat covers, it’s essential to thoroughly clean and prepare your car’s interior. Start with vacuuming seats and carpets to remove dust, dirt, and debris.
Wipe down surfaces with a damp cloth to eliminate stains and grease, ensuring a smooth surface for the covers.
Consider using a mild cleaner for stubborn spots, but avoid harsh chemicals that could damage upholstery. Once your interior is clean, focus on interior organization.
Use a gentle cleaner for tough stains, avoiding harsh chemicals that may harm upholstery. Organize your interior afterward.
Remove any loose items or clutter from seats and floor areas to prevent interference during installation.
This step also helps you spot any damage or wear that might need attention before fitting new covers. Ensuring a clean, clutter-free environment will make the installation process easier and help your seat covers fit snugly.
Proper preparation minimizes wrinkles, gaps, and slipping, giving your car a fresh, professional look once the covers are in place.
Removing Old or Damaged Seat Covers Safely
First off, take a good look at your seat cover to see if it’s torn or really worn out. If it is, don’t rush—carefully remove any fasteners like clips or hooks so you don’t accidentally damage the seat or the cover itself. Once you’ve got the old cover off, make sure to dispose of it responsibly, keeping your vehicle clean and safe.
Inspect Seat Cover Condition
Carefully examine your existing seat covers for signs of damage, wear, or deterioration. Check for tears, fading, or loose stitching, and consider the seat cover materials and styles to see if they’re still suitable.
Damaged covers can compromise comfort and safety, so replacing them is important. As you assess, keep in mind the condition of the fabric or leather, any signs of mold or staining, and how well they fit your vehicle’s interior.
Also, consider how easy it is to remove and whether the covers are compatible with your vehicle. Understanding the styles helps you figure out if replacing them is straightforward or if it will take more effort.
If your covers are heavily worn or don’t match new styles or materials, it’s best to replace them entirely before installing new covers. Proper inspection ensures your new seat covers fit well and last longer.
Remove Fasteners Carefully
To remove old or damaged seat covers safely, start by locating all the fasteners holding them in place. Keep in mind, fastener types vary—clips, hooks, or bolts—so you’ll need different methods to remove each.
Use the right tools like screwdrivers or pliers to avoid damaging the seat. Be gentle and patient as you work to prevent tearing or harming the material.
Here’s a quick guide:
| Fastener Types | Removal Techniques |
|---|---|
| Clips | Pry gently with a flathead screwdriver |
| Hooks | Carefully unhook by hand or with a tool |
| Bolts | Unscrew with a wrench or socket |
| Snap Fasteners | Pull or unsnap to detach |
Take your time and remove each fastener carefully. Keep them safe if you plan to reuse them or dispose of them properly.
Dispose of Old Cover Properly
When disposing of old or damaged seat covers, it’s important to do so responsibly to protect the environment. Follow proper disposal guidelines and look into recycling options to reduce waste.
Check if your local recycling center accepts fabric or plastic seat covers. If recycling isn’t available, consider repurposing parts for DIY projects or donating gently used covers to charities.
Avoid trashing them in regular waste bins, as non-biodegradable materials can harm the environment. Remember, responsible disposal helps conserve resources and minimizes landfill overflow.
Research local recycling options for textiles and plastics. Follow disposal guidelines to prevent pollution. Consider donating or repurposing usable covers, and avoid disposing of seat covers in regular trash.
Tools and Materials Needed for Seat Cover Installation
To get your car seat covers installed smoothly, you’ll want to gather a few key tools and materials beforehand. Having everything ready will make the whole process much easier and help ensure that your covers fit snugly and securely.
First off, some basic tools you’ll probably need include a pair of scissors, a staple gun or upholstery tacks, and maybe some zip ties or hooks. These will come in handy for securing the covers in place and making sure they stay put.
As for materials, it’s good to have some cleaning supplies on hand—like a damp cloth or mild cleaner—to wipe down the seats before you start. This helps the covers sit better and last longer. Depending on your seat covers, you might also want some foam padding or additional straps if included in the instructions.
And if you’re looking to make things even easier, there are a few optional accessories you can consider—like a spray adhesive for extra grip or a seat cover installation kit that includes tools specifically designed for the job. Having these extras can really help you get that professional-looking finish without too much hassle.
Essential Tools List
Installing car seat covers requires a few essential tools and materials to guarantee a smooth process. You’ll need basic items to make sure the covers fit well and stay secure.
A clean cloth helps remove dust and debris, allowing for better adhesion. A staple or upholstery gun may be necessary for securing covers tightly, especially with snug material types.
Scissors cut excess fabric or straps for a perfect fit, while a screwdriver or pliers can adjust clips or fasteners. Keep in mind, choosing material types with comfort factors in mind impacts ease of installation and long-term satisfaction.
These tools help you handle different seat designs and cover materials efficiently, making the overall process manageable and ensuring your new covers stay in place comfortably.
Required Materials Overview
Before you start attaching your car seat covers, gather all the tools and materials you’ll need. This will help make the installation smooth and stress-free.
Make sure you have the right seat cover materials for your vehicle, like elastic straps, hooks, or clips, depending on the design. Check if your covers come with specific installation features like Velcro, zippers, or drawstrings, and have those ready.
A clean cloth and mild cleaner are handy for prepping your seats. Some covers might need basic tools like scissors or a pry tool for adjustments. Having everything on hand saves time and cuts down on frustration.
Familiarize yourself with the installation techniques specific to your seat covers. This way, you can secure them properly and end up with a professional-looking finish.
Optional Accessories Needed
Gathering the right tools and accessories can make attaching your seat covers much easier and more efficient. Depending on your seat cover’s design and material options, you might need a few extras to guarantee a smooth installation.
If you’re working with custom designs, tools like a staple gun or clips can help secure the covers perfectly. To protect your upholstery and get a snug fit, consider using foam padding or non-slip mats.
A pair of scissors can help trim excess material, especially with custom or flexible fabric covers. Finally, having a fastener remover or small screwdriver can assist with removing headrests or seat trims as needed.
Being prepared with these accessories guarantees a clean, professional look while accommodating various material options and custom designs.
How to Fit Universal and Custom-Fit Seat Covers
When fitting seat covers, deciding between universal and custom-fit options affects how smoothly the process goes. Universal covers are designed to fit many seats, making installation straightforward but sometimes less precise.
Custom covers are tailored to your vehicle’s exact measurements, so they fit snugly with minimal adjustments needed. Material options range from leather to neoprene, which impact durability and comfort.
Color choices and style preferences also play a role in your decision, helping you match your car’s interior. Comparing brands can help you find quality options and see where adjustments might be needed for the perfect fit.
| Feature | Universal Covers | Custom Covers | Best Use |
|---|---|---|---|
| Fit | Loose, adjustable | Precise, snug | Versatility vs. perfect fit |
| Installation | Easier, fewer tools | More time-consuming | Quick upgrades vs. custom appearance |
| Material & Style | Wide options, broad appeal | Specific to vehicle, tailored | Budget-friendly vs. personalized style |
Installing Seat Covers on Headrests and Armrests
Installing seat covers on headrests and armrests takes some care to get a secure, neat fit. First, remove the headrests and armrests if you can.
For headrest covers, slide the cover over the headrest, making sure it’s snug and shaped properly. For armrest covers, stretch the cover over the armrest and smooth out any wrinkles.
Keep these tips in mind:
Ensure a clean, snug fit and smooth out wrinkles for a professional, polished look.
- Make sure headrest covers fit tightly without slipping.
- Tuck away any excess fabric for a clean look.
- Check that armrest covers don’t block movement.
- Adjust the covers as needed for an even, tidy appearance.
How to Secure Seat Covers to Prevent Slipping and Wrinkles
To keep your seat covers secure and wrinkle-free, start by anchoring them firmly in place. Using slip-resistant materials can help prevent sliding, while anti-slip techniques ensure a snug fit. Secure the covers with hooks, straps, or elastic edges, tightening them gently so they stay in position.
| Slip Resistant Materials | Anti Slip Techniques |
|---|---|
| Rubber-backed fabric | Tuck excess fabric into creases |
| Non-slip seat pads | Use clips or fasteners |
| Grippy silicone strips | Tighten straps evenly |
| Textured surfaces | Smooth out wrinkles during installation |
This combo keeps the covers stable, stopping wrinkles and shifting during use. Always double-check the tension and placement, and adjust as needed.
Proper anchoring with slip-resistant materials and anti-slip techniques ensures a neat, secure fit that lasts.
Troubleshooting Common Seat Cover Installation Problems
Despite careful installation, you might run into common issues like loose fabric, wrinkles, or shifting covers. These problems often come from missed steps or simple mistakes during setup.
To fix loose fabric, double-check that all straps and fasteners are tight. Wrinkles can usually be smoothed out by pulling the cover evenly and securing it snugly. If the covers shift, make sure they’re properly anchored with clips or hooks.
Double-check straps, smooth out wrinkles, and secure covers with clips to keep your seat looking neat.
Here are some helpful tips:
- Revisit the installation instructions to catch any missed steps
- Verify all fasteners are securely attached and tightened
- Smooth out wrinkles by pulling firmly and evenly
- Confirm the cover fits your seat model perfectly
Addressing these issues quickly helps keep your seat covers looking neat and working well. Paying attention to proper installation tips and avoiding common mistakes will save you time and frustration.
This will also help your seat cover last longer and stay in place.
Cleaning and Maintaining Your Seat Covers for Longevity
To keep your seat covers looking fresh and new, it’s a good idea to set up a regular cleaning routine. Just use the right washing techniques to get rid of dirt and stains without damaging the fabric.
And don’t forget about storage! When you’re not using them, store your seat covers properly to protect them from dust and sunlight. Also, steer clear of harsh chemicals—they can wear down the material over time.
If you take consistent care of them, your seat covers will last longer and stay looking great for years to come.
Regular Cleaning Routine
Regular cleaning is essential for keeping your car seat covers looking fresh and extending their lifespan. A consistent routine helps maintain fabric care and makes stain removal easier.
To keep your covers in top shape, vacuum regularly to remove dust and debris. Spot clean spills promptly to prevent stains from setting.
Use gentle cleaning solutions suited for your fabric type to avoid damage. Consider occasional deep cleaning to refresh the material.
Remember, keeping your seat covers clean not only improves their appearance but also prolongs their durability.
- Vacuum regularly to prevent dirt buildup
- Address stains immediately for easier removal
- Use appropriate cleaning products for your fabric
- Avoid harsh chemicals that could damage the material
Proper Washing Techniques
When washing your car seat covers, using the right techniques helps keep them clean and durable over time. Focus on fabric care by checking the manufacturer’s instructions and choosing gentle cycles or hand washing if needed.
Use mild detergents to avoid damaging the material. For stains, treat spots promptly with a soft brush or cloth and a stain remover suited for your fabric type. Avoid harsh chemicals or bleach, which can weaken fibers.
Rinse thoroughly to remove soap residue, and air dry when possible to prevent shrinkage or deterioration. If you’re machine washing, make sure to secure zippers and fasten straps to prevent damage.
Proper washing techniques help preserve the look and longevity of your seat covers, keeping them fresh and functional longer.
Storage and Protection
Proper storage and protection are key to keeping your seat covers in good shape over time. To make sure they last, use effective storage options that shield them from dust, moisture, or sunlight.
When you’re not using them, store your seat covers in a cool, dry spot away from direct sunlight. This helps preserve the fabric’s quality and prevents damage.
Protection also means avoiding tears, fading, and mold growth, which can ruin how they look and work. To get the best results, try these tips:
- Use breathable bags or containers for storage
- Clean and dry covers thoroughly before storing
- Avoid folding sharp edges to prevent tears
- Rotate between different sets to reduce wear and tear
Following these simple steps keeps your seat covers clean, fresh, and protected for years.
Frequently Asked Questions
Can I Install Seat Covers Myself Without Professional Help?
Yes, you can definitely install a DIY seat cover yourself. With some basic tools and patience, it’s straightforward.
Follow these installation tips: carefully read the instructions, remove your seat headrests if needed, and stretch the cover tightly over the seat. Make sure to secure all clips and fasteners properly.
Taking your time will help you get a snug fit. No professional help needed—just a little effort and attention to detail!
How Do I Remove Water or Stains From Seat Covers?
To remove water or stains from your seat covers, start with stain removal by gently blotting the area with a clean cloth. Use cleaning tips like a mix of mild detergent and water, then apply it with a soft brush or cloth.
Avoid harsh chemicals, and always test in a small area first. Let the covers air dry completely, ensuring your stain removal efforts are effective without damaging the fabric.
Are There Seat Covers Suitable for Heated or Cooled Seats?
Yes, you can find seat covers compatible with heated or cooled seats. Look for covers made from specialized fabrics like breathable mesh or microfiber, which help prevent overheating and keep cooling features active.
When installing, follow specific tips to ensure the covers don’t block seat controls or sensors. It’s important to be cautious because not all covers are designed for climate-controlled seats.
Choose your seat cover carefully to maintain both comfort and functionality. This way, you get the protection you want without interfering with your seat’s heating or cooling features.
How Often Should I Replace or Update My Seat Covers?
You should replace or update your seat covers when they show significant wear, stains, or damage. How often you do this depends on the material—leather, fabric, or neoprene.
Regularly inspect your covers to see if they need a refresh. Follow installation tips to ensure they fit snugly and look good.
If your covers are heavily soiled or torn, it’s definitely time for a new set. Keeping them in good condition boosts comfort, looks, and protects your seats.
Do Seat Covers Affect Airbag Deployment in Case of an Accident?
Seat covers can impact airbag deployment if they’re not airbag compatible. You need to check that they meet safety standards, especially for side airbags.
Poorly fitted or incompatible covers might block airbags, which can reduce their effectiveness during an accident. Always pick seat covers labeled as airbag compatible and follow the manufacturer’s instructions.
This way, you stay safe and ensure your airbags deploy properly when needed, helping protect you during emergencies.
Conclusion
Properly installing your car seat covers not only keeps your interior looking sharp but also protects your seats and extends their lifespan. Think of it like wearing a well-fitted outfit—you’ll feel more confident and comfortable.
Curiously, some experts believe that a snug fit can even improve your driving experience by preventing distractions from slipping covers. So, take your time, follow these steps, and enjoy a refreshed, protected ride for miles to come.
Remember, a properly installed car seat cover adds style and protection, making your driving experience more enjoyable.